
The last thing you want is to have your sensitive data hijacked because of bad web security practices. That's why you absolutely must create a self-signed certificate on your Ubuntu 24.04 VPS for your Apache or Nginx server.
Securing your web traffic with SSL/TLS encryption to handle HTTPS communications is an essential part of building any public or private web service, because without it, your web service will have weak privacy and insecure data transfer, and users won’t trust your services.

Why Create a Self-Signed Certificate on Ubuntu?
Once you create a self-signed certificate on Ubuntu, SSL/TLS encryption will protect your data transfer and prevent sensitive data exposure, in addition to ensuring that the connection is between the correct entities by cryptographically verifying that you’re connecting with an authentic server, and that the messages have not been interfered with while being transferred.
Note: From now on we will refer to SSL/TLS certificates as simply "SSL certificates" for brevity.
How to Create a Self-Signed Certificate on Ubuntu
To create a self-signed certificate on Ubuntu, you'll need to use OpenSSL to generate a private key and a self-signed certificate, specifying the required details like the certificate's validity period and your organization's information. Next, you'll save the key and certificate files in a secure location, and then use it in your Apache or Nginx server configuration.
(Special Offer) - Simplify Your SSL Setup with Our 1-Click VPS Applications
If generating a self-signed SSL certificate sounds daunting, we've got you covered. Our 1-Click VPS applications (WordPress, phpMyAdmin, LAMP, and LEMP, and many others) come with a pre-installed self-signed SSL certificate. Just a few clicks and you're ready to go! Visit our website to get started with the lowest-cost VPS offerings in the world (self-signed certificates included)!
Step 1 - Using OpenSSL to Generate a Self-Signed Certificate
To create a self-signed certificate on Ubuntu, you will use OpenSSL to generate a certificate file that will store some basic information about your site, accompanied by an SSL private key file that will be kept secret in the server, and the server then will use it to securely handle encrypted data.
OpenSSL is a software library that provides tools for general-purpose cryptography and secure communications.
The private SSL key is used by the server to encrypt the content it sends to clients (e.g., web browser) The public SSL certificate is shared publicly with clients requesting the content. So when you request a page, the browser gets the SSL certificate from the server, and uses it to decrypt and access the content signed by the associated private SSL key.
The first step to obtaining an SSL certificate is using OpenSSL to create a certificate signing request (CSR). In normal cases, the CSR will be sent to the Certificate Authority (CA) which in turn will create a certificate based on it. In our case (self-signed certificate), we will create the certificate ourselves based on this CSR we generate using OpenSSL. The CSR contains the common name(s) you want your certificate to secure, information about your company, and your public key.
Note: In order for a CSR to be created, it needs to have a private key from which the public key is extracted. This can be done by using an existing private key or generating a new private key. It is strongly recommended to generate a new private key when creating a CSR instead of using an existing one.
To create a certificate signing request (CSR) and a private key with the openssl library, you will use the openssl req command with the following command structure:
openssl req -x509 -newkey rsa:<rsa_value> -nodes -out <public certificate path> -keyout <private key path> -days <certificate duration in days> -subj "C=<country code>/O=<organization name>/OU=<organizational unit>/CN=<common name>"Here is what each part of the preceding command means:
-x509: A multi-purpose certificate utility. It can be used to display certificate information, convert certificates to various forms, sign certificate requests like a "mini CA" or edit certificate trust settings.-newkey: Specifies that a new private key should be created with the certificate request.-rsa:: The encryption algorithm you’ll use to generate your key. While you can use other encryption algorithms if you want, RSA is one of the best encryption systems that you can use to protect your data in transmission, especially because it comes with great compatibility.<rsa_value>represents the key size in bits.-nodes: is not the English word "nodes", it refers, instead, to "no DES". When given as an argument, it means OpenSSL will not encrypt the private key in a PKCS#12 file, and the private key will not have a passphrase. This is important for the web server to have access to the certificate file without needing a passphrase. Otherwise the server would wait for the user to manually enter the passphrase every time the server restarts, which is not convenient.-out: defines the path the public key will be generated to, including the filename.-keyout: defines the path the private key will be generated to, including the filename.-days: The certificate’s lifetime in days.-subj: is used to provide all the necessary information within the command itself, instead of having to provide each required piece of information via command line prompts.Cdefines the two-letter country code where your company is legally located.Odefines the organization’s name.OUdefines the organizational unit name, which can be the name of your department within the organization.CNis the common name, where you either enter the fully-qualified domain name (FQDN) you’ll use to access the server by (e.g., www.example.com), or the public IP of the server.
Now that you are familiar with the openssl command options and actions, you can form and execute an openssl command to generate a certificate signing request (CSR) as follows:
sudo openssl req -x509 -newkey rsa:4096 -nodes -out /etc/ssl/certs/ssl-selfsigned.pem -keyout /etc/ssl/private/ssl-selfsigned.key -days 365 -subj "/C=US/O=MyCompany/OU=Technical Department/CN=www.example.com"
This command will generate two files automatically created under the respective subdirectories you’ve declared:
/etc/ssl/private/: will be the location of the SSL private key file./etc/ssl/certs/: will be the location of your CSR file.
In our example, this means that the following files will be generated:
/etc/ssl/private/ssl-selfsigned.key: your SSL private key file./etc/ssl/certs/ssl-selfsigned.pem: your CSR file, which you can use as a self-signed certificate.
Step 2 - Configuring Apache and Nginx to Use a Self-Signed Certificate
Now that you have your very own self-signed SSL certificate in the form of a CSR file, you can use it to encrypt your data and serve HTTPS requests. To do so, you need to configure your web server to use it. In this step, you’ll learn how to configure and use your self-signed SSL certificate on the two most popular HTTP web servers: Apache, and Nginx.
Creating a Self-Signed SSL Certificate For Apache on Ubuntu

In this section, you’ll learn how to configure the Apache web server to use your self-signed SSL certificate.
First, open Apache’s default configuration file:
sudo nano /etc/apache2/sites-enabled/000-default.confBy default, your Apache welcome page loads on port 80 without an SSL certificate.
Your Apache’s default configuration will be similar to the following:
<VirtualHost *:80>
        Define servername www.example.com
        ServerName ${SERVERNAME}
        ServerAdmin webmaster@localhost
        DocumentRoot /var/www/html
</VirtualHost>
Replace the existing content with the following configuration, and make sure to set the correct values where needed (highlighted in yellow below):
<VirtualHost *:80>
        Define servername www.example.com
        ServerName ${SERVERNAME}
        RewriteEngine on
        RewriteRule ^/.*$ https://\${SERVERNAME}%{SCRIPT_FILENAME}?%{QUERY_STRING} [R=301]
        ErrorLog ${APACHE_LOG_DIR}/error.log
        CustomLog ${APACHE_LOG_DIR}/access.log combined
</VirtualHost>
<VirtualHost *:443>
        SSLEngine On
        SSLCertificateFile /etc/ssl/certs/ssl-selfsigned.pem
        SSLCertificateKeyFile /etc/ssl/private/ssl-selfsigned.key
        ServerName ${SERVERNAME}
        DocumentRoot /var/www/html
        ErrorLog ${APACHE_LOG_DIR}/error.log
        CustomLog ${APACHE_LOG_DIR}/access.log combined
</VirtualHost>
Here you add two configurations, one for HTTP connections on port 80, and one for HTTPS on port 443.
In the HTTP configuration, you use the RewriteEngine and RewriteRule to redirect HTTP requests to HTTPS. And you also set locations for log files.
In the Apache SSL virtual host example configuration above, you set the SSLEngine directive to On to enable the SSL/TLS Protocol Engine. You set the paths of the self-signed SSL certificate and the SSL private key files you generated earlier. You declare the server name, and the document root directory that holds the files Apache serves. And you also set locations for log files.
Next, use the a2enmod tool to enable the SSL and the RewriteEngine Apache modules. This allows Apache to use SSL/TLS encryption, and the RewriteEngine feature to rewrite requested URLs and redirect users from HTTP to HTTPS:
sudo a2enmod ssl rewriteNext, test for configuration errors:
sudo apache2ctl configtestYou should receive an output that contains the text Syntax OK, which means you can safely reload Apache, otherwise, you will get a very specific description pointing out the error you have to fix.
Next, restart Apache:
sudo systemctl restart apache2
Now visit your website’s domain name or IP address using https:// at the beginning:
https://domain_name_or_IPYou should see an error telling you that the website is not secure. This means that the self-signed certificate is properly installed, but because the browser does not recognize your certificate as valid, you’ll receive this error. As we’ve mentioned earlier, this self-signed certificate is only for testing purposes and internal use, and not to secure your website for production, because your certificate is not signed by any of the browser’s known certificate authorities. To install a certificate that browsers trust check out this article.
Now that you’ve learned how to configure Apache to use a self-signed certificate, you’ll see how to do the same with an Nginx server.
Creating a Self-Signed SSL Certificate For Nginx on Ubuntu

In this section, you’ll learn how to configure the Nginx web server to use your self-signed SSL certificate.
First, open Nginx's default configuration file:
sudo nano /etc/nginx/sites-enabled/defaultBy default, your Nginx welcome page loads on port 80 without an SSL certificate. So, you would see something similar to the following configuration:
server {
        listen 80;
        listen [::]:80;
        root /var/www/html;

        index index.html index.htm index.nginx-debian.html;

        server_name www.example.com;
        location / {
                    try_files $uri $uri/ =404;
        }
}
Replace the existing content with the following configuration, and make sure to set the correct values where needed (highlighted in yellow below):
server {
    listen 80;
    listen [::]:80;
    server_name www.example.com;
    access_log off;
    location / {
        rewrite ^ https://$host$request_uri? permanent;
    }
}

server {
    listen 443 ssl;
    listen [::]:443 ssl;
    server_name www.example.com;
    root /var/www/html;
    index index.php index.html index.htm index.nginx-debian.html;
    autoindex off;
    ssl_certificate /etc/ssl/certs/ssl-selfsigned.pem;
    ssl_certificate_key /etc/ssl/private/ssl-selfsigned.key;
    ssl_protocols TLSv1 TLSv1.1 TLSv1.2;
    ssl_ciphers HIGH:!aNULL:!MD5;

    location ~ \.php$ {
         include snippets/fastcgi-php.conf;
         fastcgi_pass unix:/var/run/php/php-fpm.sock;
         fastcgi_param SCRIPT_FILENAME $document_root$fastcgi_script_name;
         include fastcgi_params;
    }
}
Here, you have two server blocks representing configuration for two ports: port 80 which serves HTTP requests, and port 443 that serves HTTPS requests.
Notice that, in the HTTP configuration, you use the rewrite directive in the location block to redirect HTTP requests to HTTPS.
In the HTTPS configuration, you set up Nginx to use SSL and set the path of the self-signed SSL certificate file and the SSL private key file you generated earlier. In the location ~ \.php$, you set up Nginx to process PHP files with the php-fpm package.
With the configuration file modified, check for syntax errors in it using the following command:
sudo nginx -tThe output should let you know that the configuration file test is successful.
Now, restart Nginx:
sudo systemctl restart nginxNow visit your website’s domain name or IP address using https:// at the beginning:
https://domain_name_or_IPAgain, you should see an error telling you that the website is not secure, as this self-signed certificate is only for testing purposes and internal use, and not to secure your website for production, because your certificate is not signed by any of the browser’s known certificate authorities. Again, to install a certificate that browsers trust check out this article.
Step 3 - Verify That Your Self-Signed SSL Certificate Works
Before you verify that your self-signed SSL certificate works, please check the following:
- In the configuration files of both Apache and Nginx, remember to set the server name value to whatever you intend to address your server with. This can be a hostname, full domain name, or an IP address, and make sure it matches the Common Name you chose when creating the certificate. In Apache, the server name is configured using the
ServerNamedirective, and in Nginx, it’s theserver_namedirective. - The document root is the root directory you serve your web files from. It is configured using the
DocumentRootdirective in Apache, and therootdirective in Nginx. - The redirection configurations we’ve added introduce the good practice of responding on port 80, even if you want to force all traffic to be encrypted. Whenever a user requests a page using an HTTP request, they will be automatically redirected to the HTTPS equivalent of the URL they’ve requested. You can test this new redirect functionality by visiting your site with plain
http://and you’ll notice that you will be automatically redirected to a URL beginning withhttps://. - If you visit your site in a browser, prefixing
https://to the URL, you would get an error, explaining that your website is not secure as mentioned above. This means that the browser can’t verify the identity of the server, since the certificate is not signed by any of its known certificate authorities. However, this is completely normal for a self-signed certificate and actually means that your SSL configuration is successful.
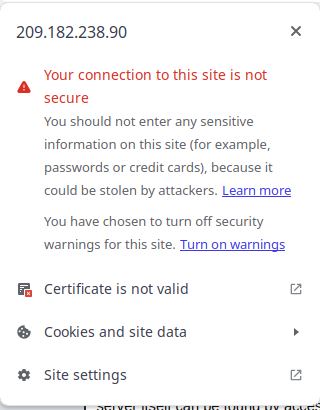
On receiving the browser error that tells you that the connection is not secure, click the Advanced button or More information depending on the browser, and choose to proceed. The following is an example of the error in the Google Chrome browser:
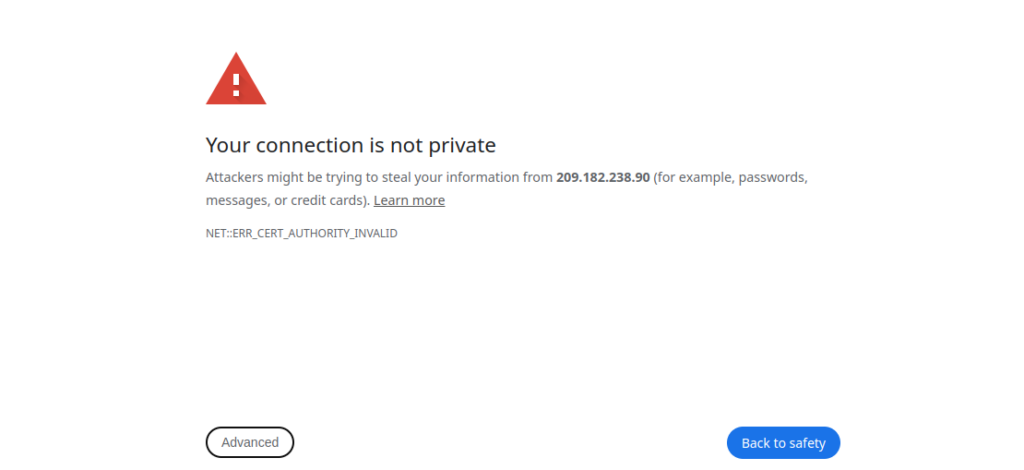

Once you proceed, your browser will load the Apache or Nginx welcome page, but with a noticeable danger icon and a Not Secure label at the beginning of your URL.
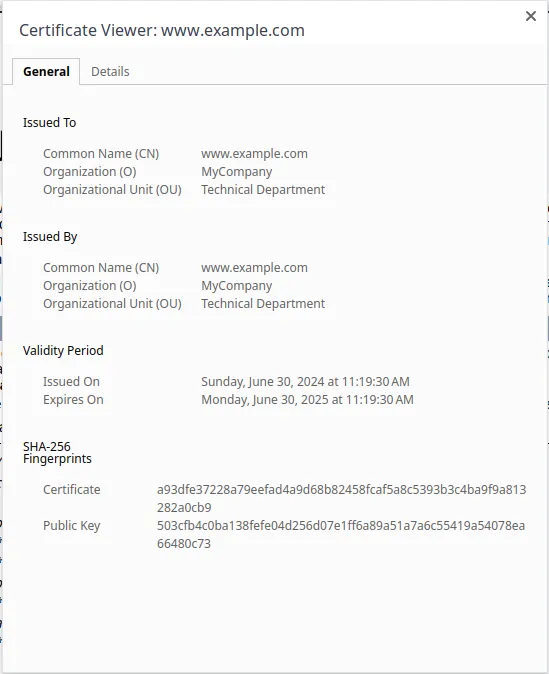
If you click the danger icon, the browser will inform you that the certificate is not valid:
A Self-Signed SSL Certificate with Apache (Example)
Here is the Apache welcome page with a self-signed SSL certificate:

A Self-Signed SSL Certificate with Nginx (Example)

In the pop-ups above, click on “Certificate is not valid” for more details on the self-signed certificate. (Note the 1-year duration, we’ve declared using the days value on the certificate’s creation).
Although this sounds like something has gone wrong, don't worry! This is how you verify that the self-signed certificate is successfully installed!
To avoid this error and install a trusted certificate check out this article.
Congrats!
Your website has become certified with a self-signed certificate, and you can now securely transfer data through HTTPS, and protect your internal traffic.
Facing Difficulties? - Simplify Your SSL Setup with Our 1-Click VPS Applications
If generating a self-signed SSL certificate sounds too complex, we've got you covered. Our 1-Click VPS applications (WordPress, phpMyAdmin, LAMP, and LEMP, and many others) come with a pre-installed self-signed SSL certificate. Just a few clicks and you're ready to go! Visit our website to get started with the lowest-cost VPS offerings in the world (self-signed certificates included)!
FAQ: Creating a Self-Signed Certificate on Ubuntu for Apache and Nginx
How to Renew a Self-Signed Certificate?
To renew a self-signed certificate, generate a new certificate with updated validity. For Apache or Nginx on Ubuntu, use OpenSSL to create a new key and certificate.
Update the configuration files of your web server to use the new certificate and restart the server to apply the changes.
How to Remove a Self-Signed Certificate?
To remove a self-signed certificate, delete the certificate and key files from your server, then update your web server's configuration files to remove references to the deleted certificate and restart the server.
Firefox: The Certificate is Not Trusted Because it is Self-Signed
Firefox does not trust self-signed certificates by default because they are not issued by a recognized Certificate Authority (CA). To bypass this, you can manually add the self-signed certificate to Firefox's trusted certificates:
- Visit the site with the self-signed certificate in Firefox.
- Click on the warning icon in the address bar.
- Click "Advanced" and then "Accept the Risk and Continue."
A note about tutorials: We encourage our users to try out tutorials, but they aren't fully supported by our team—we can't always provide support when things go wrong. Be sure to check which OS and version it was tested with before you proceed.
If you want a fully managed experience, with dedicated support for any application you might want to run, contact us for more information.